
Have you ever wondered how to transform your floors into a stunning 3D masterpiece?
This comprehensive guide will walk you through the process of laying a 3D resin floor from start to finish.
We cover the essential materials needed to prepare the surface and mix the resin, creating the mesmerizing 3D effect, and adding finishing touches.
Get ready to bring a whole new dimension to your living space with a 3D resin floor!
What Is A 3D Resin Floor?
Table of Contents
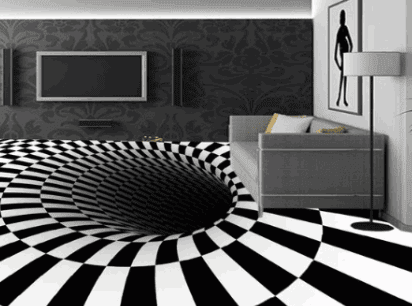
A 3D resin floor, commonly known as an Epoxy 3D floor, is a unique flooring solution that provides a stunning visual effect with high strength and durability. These floors are coated with a protective varnish to enhance their longevity and aesthetics.
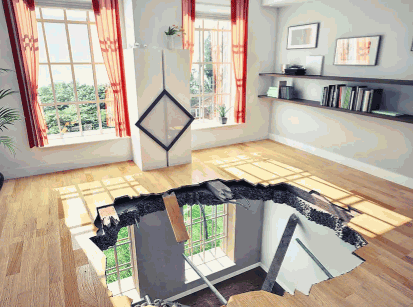
The visual effects created by a 3D resin floor are truly mesmerising, giving the illusion of depth and dimension to any space. The high strength of these floors makes them ideal for areas with heavy foot traffic or equipment. The protective varnish not only adds a beautiful finish but also ensures that the floor is resistant to scratches, stains, and damage from chemicals or UV rays. This combination of durability, visual appeal, and protection makes 3D resin floors a popular choice for both residential and commercial settings.
Uncover more: What Is The Cost Of Resin Flooring
What Are The Materials Needed To Lay A 3D Resin Floor?
To lay a 3D resin floor, you will need essential materials such as epoxy primer, clear epoxy, and a protective sealer. These components are crucial for ensuring a successful and long-lasting resin floor installation.
Starting with the epoxy primer, this material acts as a bonding agent between the concrete substrate and the resin, ensuring proper adhesion and a smooth finish.
The clear epoxy serves as the main component that provides the flooring system with its decorative colours and patterns, giving it a unique and vibrant appearance.
Once the epoxy layers are in place, applying a protective sealer becomes essential. This final layer acts as a barrier against scratches, stains, and UV damage, enhancing the durability and longevity of the resin floor. Each of these materials plays a critical role in the overall quality and performance of the 3D resin floor.
Resin
Resin is the primary component used in creating a 3D resin floor. It acts as the base material that provides the necessary adhesion and visual effect for the flooring.
The role of resin goes beyond just aesthetics. It plays a crucial part in enhancing the overall durability and strength of the floor, ensuring it can withstand heavy foot traffic and daily wear and tear. The epoxy primer further enhances the bonding characteristics of the resin, creating a seamless and long-lasting finish. This careful combination of resin and epoxy primer results in a high-gloss, smooth surface that not only looks visually stunning but also performs exceptionally well in various environments.
Hardener
The hardener is a crucial component that, when combined with resin, forms a clear epoxy mixture. This mixture enhances the floor's strength and durability, making it suitable for high-traffic areas.
By catalysing the resin, the hardener accelerates the curing process, ensuring that the clear epoxy sets properly. The chemical reaction between the resin and hardener not only solidifies the mixture but also creates a bond that provides exceptional strength, capable of withstanding heavy loads. The hardener plays a key role in achieving a smooth and level surface, free from imperfections, delivering a visually appealing floor finish. Its precise measurement and proper mixing are essential to ensure the epoxy cures to its full potential, creating a long-lasting and resilient floor.
Pigments
Pigments are used to add colour and design elements to the 3D resin floor. They are mixed with epoxy primer to create customised patterns and visual effects on the flooring surface.
When pigments are expertly blended into the epoxy primer, they seamlessly integrate into the resin floor, enhancing its aesthetic appeal. The process of mixing pigments with the epoxy primer allows for a wide range of design possibilities, making each floor unique and visually striking. The pigments disperse evenly, creating a harmonious fusion of colours that can mimic natural textures or abstract geometric patterns.

Tools (Roller, Trowel, etc.)
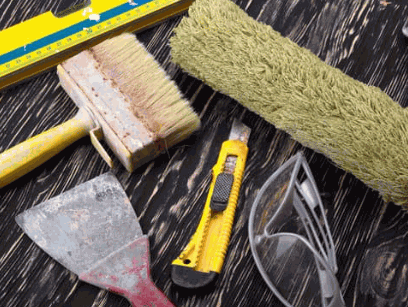
Various tools such as rollers and trowels are essential for the proper installation of a 3D resin floor. These tools aid in spreading the resin mixture evenly and smoothing the surface for a flawless finish.
Items like mixing buckets, notched squeegees, and levelling tools play crucial roles in preparing the surface before the resin application. Mixing buckets ensure accurate blending of resin components, while notched squeegees help in distributing the mixture uniformly. The levelling tools are essential for achieving the desired flatness and eliminating any imperfections in the base layer.
- Furthermore, measuring tapes and protective gear is essential for safety and precision during the installation process. Measuring tapes assist in maintaining accurate dimensions, while protective gear, including gloves and goggles, safeguards the installers from the chemicals and fumes produced by the resin. Ensuring the availability and proper use of these tools are vital steps towards a successful resin floor installation.
How To Prepare The Surface For A 3D Resin Floor?
Preparing the surface for a 3D resin floor is a crucial step to ensure a seamless installation. This process involves thorough cleaning, repairing any cracks or flaws, and applying a suitable primer for optimal adhesion.
- Starting with cleaning, ensure the surface is free of any dust, dirt, or debris. This can be done through vacuuming, sweeping, and mopping.
- Next, addressing any cracks and flaws is essential. Use a crack filler to mend any imperfections and create a smooth base.
- After repairing, applying a high-quality primer is key. Primers help to enhance adhesion, ensuring the resin floor bonds well to the surface.
This comprehensive process sets the foundation for a durable and visually appealing 3D resin floor.
Clean The Surface
Cleaning the surface is the first step in preparing for a 3D resin floor. It involves removing any dirt, debris, or contaminants to ensure proper adhesion of the resin mixture to the substrate surface.
Proper surface cleaning is crucial in the initial stages of the preparation process as it sets the foundation for a successful application. Removing impurities not only promotes a seamless bond between the resin and the substrate but also enhances the overall durability and longevity of the flooring system.
By meticulously eliminating dust and residues, you create a smooth canvas for the resin to adhere to, preventing any potential issues such as delamination or bubbling. This meticulous attention to detail during the cleaning phase significantly improves the final finish and ensures a high-quality result.
Repair Any Cracks Or Damage
Repairing any cracks or damage on the surface is essential to achieve a seamless epoxy finish. Addressing these imperfections ensures a smooth and flawless base for the resin flooring installation.
Without repairing these flaws, the seamless epoxy finish would be compromised, leading to potential issues like bubbling or unevenness in the resin floor. By meticulously filling in gaps and cracks, the surface becomes not just visually appealing but also structurally sound.
A flawless base serves as the foundation for the resin application, allowing it to bond securely and evenly. This attention to detail in repairing imperfections paves the way for durable and long-lasting resin flooring that maintains its aesthetic appeal over time.
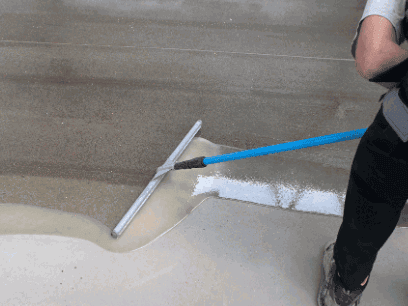
Apply Primer
Applying a primer is crucial to enhance adhesion and ensure proper bonding of the resin mixture to the substrate surface. The epoxy primer acts as a protective sealer that prepares the surface for the subsequent resin application.
The epoxy primer plays a vital role in creating an optimal surface condition by filling in any imperfections or pores present in the substrate, ensuring a smooth and uniform base for the resin coating. It also helps in improving the overall durability and resistance of the final coating by providing a strong barrier against moisture and other environmental factors.
Proper assessment of substrate conditions before applying the epoxy primer is essential to guarantee its effectiveness. It is imperative to clean the surface thoroughly, remove any existing coatings or contaminants, and ensure that the substrate is dry before application to maximise adhesion.
How To Mix The Resin And Hardener?
Mixing the resin and hardener correctly is crucial for a successful 3D resin floor installation. Achieving the right ratio and thorough mixing are key factors in ensuring the desired finish and durability.
When mixing resin and hardener, precision is essential. The ratio between the two components must be exact to guarantee a strong chemical bond and prevent issues such as cracking or yellowing over time. Thoroughly blending the resin and hardener together ensures uniformity and consistency, which is vital for a seamless application and even curing. Taking the time to mix the components properly can make a significant difference in the final outcome of your 3D resin floor.
Calculating The Right Ratio
Calculating the right ratio of resin to hardener is essential for the proper curing and performance of the 3D resin floor. A precise ratio ensures the optimal chemical reaction and durability of the flooring.
When the resin and hardener are mixed in the correct proportions, it sets off a controlled exothermic reaction that promotes the hardening process. This, in turn, enhances the overall strength and toughness of the epoxy floor. Deviation from the recommended ratio can lead to incomplete curing, resulting in a weaker surface prone to damage and delamination. It is crucial to follow manufacturer guidelines meticulously to achieve the desired finish and longevity for your resin flooring.
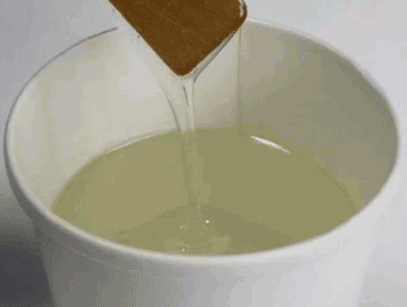
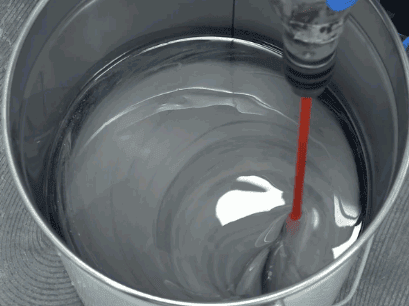
Mixing The Resin And Hardener
Thoroughly mixing the resin and hardener is essential to create a clear epoxy mixture with optimal strength and durability. Proper mixing techniques ensure a uniform blend for a successful resin floor application.
When combining the two components, it is crucial to measure them accurately according to the specified ratio to achieve the desired properties in the clear epoxy. Avoid rushing through the mixing process as inadequate blending can result in a cloudy or tacky finish that lacks the durability required for long-lasting results.
For best results, use a clean container and mixing tool to prevent any contaminants that could impact the clarity and strength of the final clear epoxy. Take the time to scrape the sides and bottom of the container during mixing to ensure all parts are thoroughly combined, promoting a consistent appearance and structural integrity in the cured product.
Adding Pigments
Adding pigments to the resin mixture allows for customised design and color options for the 3D resin floor.
These carefully selected pigments play a crucial role in determining the overall aesthetic appeal of the flooring.
Design elements are intricately woven into the mixture, giving rise to stunning swirls, gradients, or even mesmerizing translucent effects. The secret lies in the mixture ratios, where precise measurements ensure a harmonious fusion between the resin and pigments.
How To Apply The Resin Mixture On The Floor?
Applying the resin mixture on the floor requires precision and skill to ensure an even and smooth finish. Techniques such as pouring, spreading with a roller, and using a trowel for smoothing are essential for a successful installation.
When applying the resin mixture, it is crucial to start by pouring the mixture onto the prepared surface.
Next, using a roller, gently spread the resin evenly to cover the designated area. The roller helps in distributing the resin uniformly, preventing any patches or uneven coating.
Once the resin is spread out, the trowel comes into play as a key tool for achieving a seamless finish. With the trowel, carefully smooth out any imperfections, ensuring a professional and flawless outcome.
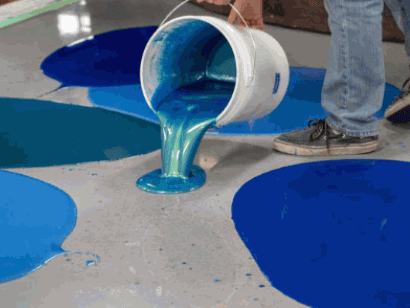
Pouring The Resin Mixture
Pouring the resin mixture onto the floor is the initial step in the application process. It involves spreading the mixture evenly to establish the base layer for the 3D resin floor.
Creating an even base layer is crucial to ensure a smooth and uniform surface for the resin floor. Proper pouring technique plays a significant role in achieving this. A key aspect is to start pouring the mixture from one end of the area and continue in a steady, controlled manner to cover the surface gradually. This method prevents clumping or uneven distribution, which can result in an inconsistent final appearance. By mastering the art of spreading the mixture evenly, you pave the way for a flawless resin flooring application.
Spreading With A Roller
Using a roller to spread the resin mixture ensures uniform coverage and smoothness on the floor surface.
It is essential to maintain a steady pace and even pressure while using the roller to ensure that the resin is distributed evenly across the surface. This method not only aids in achieving a seamless finish but also minimizes the likelihood of patchy or uneven application.
The roller allows for better control over the amount of resin applied, preventing excess material buildup in certain areas. By covering the surface methodically, the roller ensures that every part of the floor receives an equal coating, resulting in a professional and polished appearance.
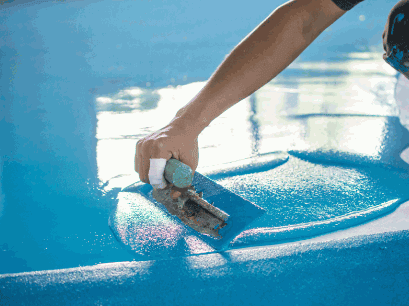
Using A Trowel For Smoothing
Using a float for smoothing the resin mixture is essential to create a seamless and polished finish on the 3D resin floor. This tool helps level the surface and eliminate any imperfections for a professional result.
By effectively using a float, one ensures that the resin mixture is evenly spread across the surface, preventing any uneven patches that could disrupt the overall appearance. The smooth application achieved through the float plays a crucial role in enhancing the durability of the resin floor, as it minimises the risk of weak points or bubbling. The precise manoeuvring of the float allows for meticulous detailing, ensuring that the finish is not only smooth but also aesthetically pleasing.
How To Create The 3D Effect?
Creating a 3D effect on the resin floor involves strategic design and layering techniques.
In terms of design, selecting the right colour palette plays a crucial role in creating a captivating visual impact.
Combining vibrant shades with subtle tones can add depth and contrast to the overall design, enhancing the 3D effect. Incorporating texture through various layering techniques such as marbling or metallic accents can further elevate the aesthetic appeal.
By skillfully arranging these layers, a sense of movement and fluidity can be introduced to the floor, making it a dynamic focal point in any space. Experimenting with different design elements and layering methods allows for endless possibilities in creating a truly unique resin floor.

Using Stencils
Incorporating stencils in the design process helps create intricate patterns and shapes for the 3D effect on the resin floor. Stencils allow for precision and consistency in achieving unique visual elements.
By using stencils, designers can transform a plain resin floor into a work of art, enhancing its aesthetic appeal. The use of stencils offers a methodical approach to applying detailed designs, ensuring that each element fits seamlessly within the overall pattern.
Precision is key when working with stencils, as even the slightest deviation can impact the final result. Stencils provide a level of consistency that is challenging to achieve through freehand techniques, making them essential in creating intricate shapes and patterns in 3D flooring designs.
Adding Layers
Adding layers to the resin floor enhances the depth and complexity of the 3D effect. By strategically incorporating multiple layers, a sense of dimension and realism can be achieved in the flooring design.
Layering in a resin floor is a meticulous process that involves pouring each layer with precision to ensure a seamless blend of colours and textures. The 3D effect is further accentuated by varying the opacity and thickness of each layer, creating a stunning visual depth that captivates the eye. Each layer adds a new dimension to the design, allowing for intricate patterns and intricate detailing to come to life as the layers build up. The result is a truly mesmerising flooring masterpiece that transforms the space into a work of art.
How To Finish And Maintain A 3D Resin Floor?
Finishing and maintaining a 3D resin floor is essential for preserving its aesthetic appeal and longevity. Removing air bubbles, applying a protective top coat, and regular cleaning are key steps in ensuring the floor's durability.
In terms of 3D resin floors, proper care not only enhances the visual appeal but also extends its lifespan, making it a worthwhile investment. Protective top coat application acts as a shield against scratches, stains, and chemical damage, enhancing the floor's resilience. To ensure a seamless finish, addressing any trapped air bubbles during the installation process is crucial. Establishing a routine cleaning regimen with gentle yet effective cleaners helps maintain the floor's pristine condition over time.

Removing Air Bubbles
Eliminating air bubbles from the resin floor is crucial to achieve a smooth and flawless finish. Proper techniques such as rolling or squeegeeing can help in removing trapped air for a pristine appearance.
Once the resin is poured, it is crucial to carefully inspect the surface for any visible bubbles. Using a heat gun or a blowtorch on a low setting can help to delicately pop the bubbles. It is important to move the heat source constantly and not focus on one spot for too long to avoid damaging the resin.
After addressing the air bubbles, the resin should be leveled and spread evenly across the floor. This aids in creating a uniform finish and ensures a durable surface that is easy to maintain. Regular cleaning and proper maintenance will help preserve the integrity and appearance of the resin floor over time.
Applying A Protective Top Coat
Applying a protective top coat over the 3D resin floor enhances its durability and provides a glossy effect. This top coat acts as a shield against wear and tear, prolonging the lifespan of the flooring.
The protective top coat not only adds a lustrous sheen to the entire flooring but also acts as a barrier against stains and spills, making it easier to clean and maintain.
The glossy effect achieved through the top coat elevates the aesthetic appeal of the space, creating a visually pleasing environment. Along with its protective qualities, the top coat enhances the overall durability of the resin floor, ensuring it withstands daily foot traffic and other stresses without losing its shine.
Regular Cleaning And Maintenance
Regular cleaning and maintenance routines are essential to preserve the longevity and beauty of a 3D resin floor. Proper care, such as gentle cleaning and periodic inspections, can extend the lifespan of the flooring.
Proactive maintenance not only enhances the visual appeal of the floor but also prevents potential damage from occurring. By regularly removing dirt and debris, you can prevent scratches and wear that may compromise the durability of the resin surface.
Scheduled inspections allow you to identify any issues early on, enabling prompt repairs and thus avoiding costly replacements in the future. A well-maintained 3D resin floor not only retains its vibrant aesthetics but also contributes to a safe and hygienic environment.